How to create massive documents from excel data

August 5, 2020
Did you ever have to write the same content in a document more than one time just changing some basic data? We bet that you are feeling smart enough and we think that you had copied and pasted the content each time and replaced just the needed data (yes, we are just judging from our experience because we did it!). Well, we have a great new (not so new, actually) for you and we will teach you in this article how to generate massive Microsoft Word Documents from data that you have in an Excel sheet. This is known as Mail Merge in the Microsoft Office collaboration world.
For this article, we worked with Microsoft Office 2016, but you get this option since 2013, and it is still available in later versions. However, it should be noted that the layouts, the options, and the names of the tools may vary from version to version, including the Wizard’s navigation order.
Having said that, you will see how easy it is and you will not be able to believe why you suffered so much before! (yes, we did!)
First step: get organized!
First, you have to write the text content you want in a Microsoft Word document, including formats and symbols as necessary. Meanwhile, you are doing this job, you have to identify which are the constant parts of the text and which are the various parts that you have to replace each time with different data.
Now, make a list of the data that you need to replace each time (please, do not forget to consider the data type: is it a number or a currency? Is it a date maybe? and so on)
And last but not least: be sure to check the spelling and grammar of the content… we want just a great clean job!
Remember that you are creating a template with content that will be repeated every time, and we don’t want to lose the job for silly mistakes.
It is time to save your work! You don’t have to, but we recommend saving it as a Word template; this will make it easier for you to search for the document later.
To explain to you step by step, let’s do a simple payment receipt exercise. Let’s say we have a list of persons to whom we must pay and we would like to give them a receipt saying that we made a payment (please, don’t let our lenders know!).
The content of the document would look as follows:
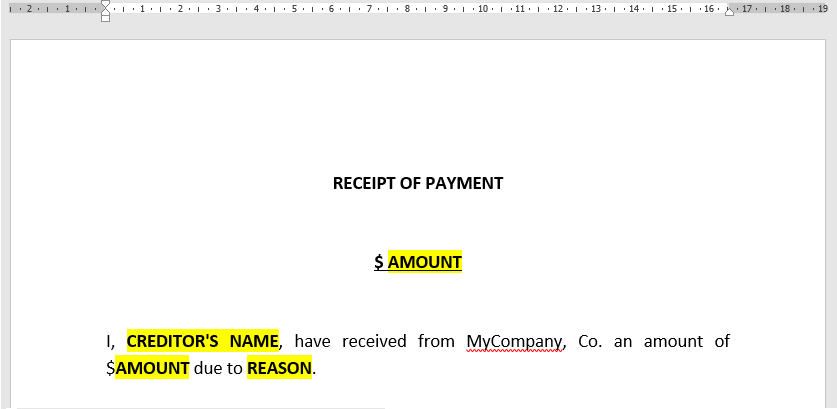
In the document, we have highlighted the variable parts that must be replaced by different data every time.
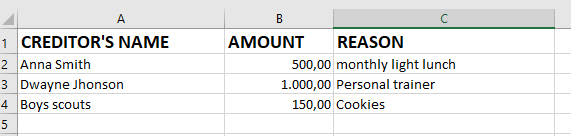
Prepare your data in excel
Create a new Excel sheet and you will have to create a table where the columns titles will be each one of the parts that you have identified in your “replaceable” data list; and filled the table with the values that you must to replace for each document you have to generate.
Let’s continue with the payment example:
For both, the Excel sheet and the Word document, we are going to save them in the same system directory (so as not to get too complicated).
Close your Excel document.
Now it’s time to open Word
With your Word document open (and already well written), go to the “Mailings” tab located at the top in the toolbar, click on the “Start Mail Merge” button, and then in the “Step by Step Mail Merge Wizard” option.
In the panel that appears, on the right side normally, you have to select “Letters” for the Document Type and click Next.
Choose to use the current document and click “Next”.
Now, on the “Select Recipients” page, select to use an existing list, and down below look forward to your Excel file with the list that you have created earlier (the Excel file has to be closed for Word to use). Then, you have to choose the sheet where is the data. You can select the columns you are going to work with, or sort and filter the data if you want to. Once this is done click on “Ok”.
At this point, with your document written, you just have to choose the fields that you have already identified to be replaced by it by clicking on the “More items” option.
In the pop-up window that opens, select each data field to require in the document to be combined and insert it. You will see how they will be inserted into the document with the column title that you have assigned and limited between double angle brackets (see the image below)
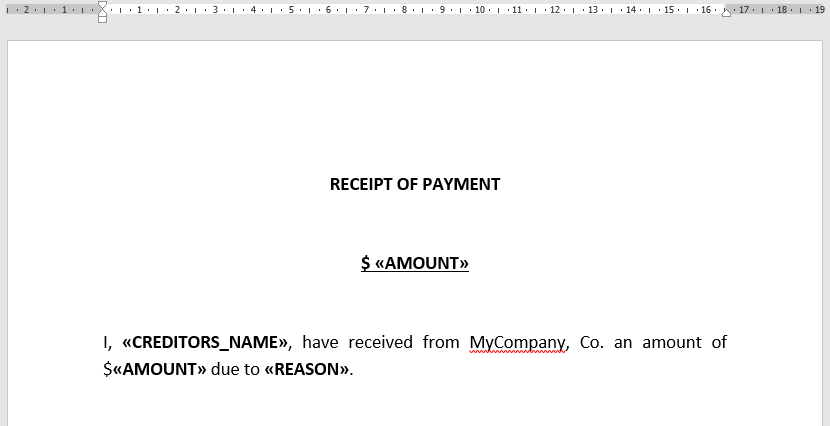
Modify the content and rearrange newly inserted elements to fit your document and apply the appropriate font format as required.
So far so good by now?
Great! Let’s continue our work!
Mail merge
We are already at the end of the goal to be able to generate our documents massively, from our Word template with all the necessary copies, but replacing the required data extracted from our Excel sheet!
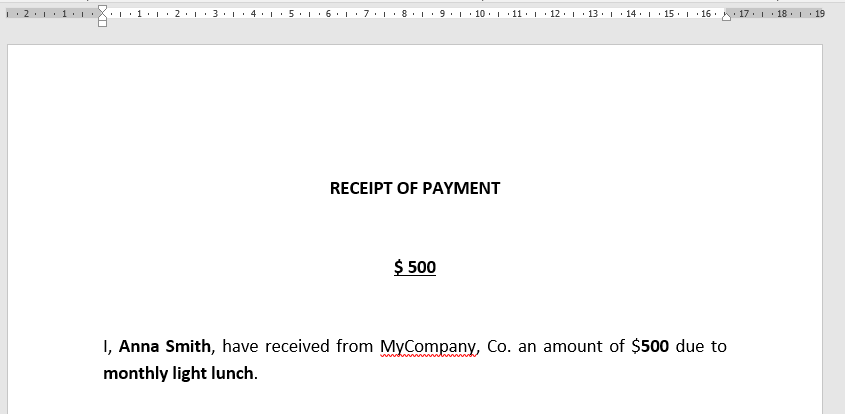
By clicking on “Next”, we will have a preview of the merge and we will be able to see each generated document. It should be noted that one document will be generated for each row of the data table extracted from the Excel sheet selected.
Review your work, make sure all is in the right place and make sure that the content was not modified incorrectly when inserting the fields.
Is everything Ok? Good! Let’s finish!
Click Next…in the panel to complete the merge.
Now you can print or save your massive documents in one for later edition or specific management!
Did you imagine how easy it would be?
Sorry, we are not responsible for all the effort you could have invested in the past. Believe us, we have been there for a long time but our eyes now see color!
We hope this article has given your life a break too!
Of course, in the Microsoft Office online help you will also get the general steps to accomplish this task with word documents.