How to prevent downloading images from Facebook

March 5, 2021
When you open a Facebook account, a number of settings must be configured to keep your account protected. But some of them remain for you to set when they start uploading photos.
The problem arises when you have the photos in public mode and someone who sees your Facebook, will have the possibility to download the image and save it. The only way to protect your images is to delete them or limit their viewing, with the option to change access privileges, modifying the privacy settings of your photos. With this option you can choose which ones of your friends can view and download the images.
All of this is made possible by the agreement between Facebook and McAfee, under the pseudonym Social Protection, which is designed to improve user privacy.
Prevent downloads of your photos on Facebook
When the photo is displayed on the screen, it is always accompanied in its top right, a three-point button, which when clicked, displays a menu, where you can see the option to download the photo. Keep in mind that if the above option did not exist, the image could be taken via a screenshot or simply by right-clicking on it to save it as an image. Which predisposes the option that anyone with the privilege of viewing your photos on Facebook has that option?
The first thing you need to do is make sure your posts aren’t public, then you can limit the visibility of your photos to your friends, you could even limit it just so you can see it yourself.
Step by step
- Log in to your browser and log in to your Facebook account.
- On the left side of your profile, in the photos section, click “View All Photos”.
- Being on that screen, you can search your photos or albums.
- Open the photo or album whose privacy settings you want to change. If it’s an album, click the three-point button in the upper-right corner and select “Edit Album”.
- Click the audience icon next to the date the photo or album was posted. Similarly, you can press the three-point button in the upper-right corner and select “Edit Recipient”.
- In the “Choose your privacy” dialog box, verify that the “Public” option is unchecked, as this option will make your photos public to anyone on Facebook or outside of Facebook for download. Then select the audience to which you want to grant access to photos or albums.
- If you want a friend or a specific list of friends to not be able to download your photos, mark “friends” as “excepted”, enter the person’s name or list and select it. Then click “Save Changes”.
- If you want some people to be able to view and download your photos, select “Specific Friends”, find your name or list, then select them and click “Save Changes”.
- If you want only you to have the option, select Only Me.
- Repeat these steps for each photo or album you want to protect.
You will also have the option to restrict all the photos you mount from now on:
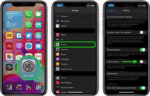
- By clicking on the inverted triangle and there select “Settings and Privacy Settings”.
- Then in the “Privacy” tab, look for the option “Your activity”.
- And then click “Edit” next to the question “Who can see your posts from now on?”
- Open the drop-down menu and select the default audience.